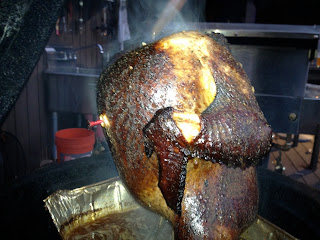
Last weekend, Stew had some good-looking ducks at his shop. So I picked up two knowing that one four-to-five pound duck feeds about two people. With the seasons changing, we thought this was a great time for Spring Cleaning Duck, and after it was carved, we put the meat on top of a great salad and it really came out great. The flavor (not the texture) is similar to Peking duck, but we didn't go through all the hassle of drying out the bird and the smoke added a great flavor, as well.
First ,I brined the ducks overnight, and making the brine is quick and easy.
Combine:
1.5 Gallons of water
1 Cup kosher salt
1 Cup orange juice
5 Garlic cloves
Tablespoon of black peppercorns
Thyme
Mix all this together, add your duck, and put it in the fridge overnight.
Next, I smoked the duck for 4.5-5 hours at 250 degrees. I used hickory and apple wood on top of the coals in the smoker.
To smoke the duck:
1. Remove duck from brine and prick the skin several times (just the skin) so the fat can run out.
2. Cut off any fat that is hanging off the bird. Dry off the bird.
3. Put the duck on a smoking spit.
4. Put the duck in the smoker with a pan underneath to catch the dripping fat.
5. Figure out a way to keep the inside of the smoker moist. I placed two cans of beer in the smoker.
6. After 30 minutes, begin basting the bird every 25-30 minutes, with the spring cleaning glaze.
7. After 5 hours it's done. Take the duck off and carve.
While the duck is smoking, you'll want to prepare your Spring Cleaning Glaze. Why odd name, you may ask? Well, this sauce gives you the chance to empty out all the mostly used jellies and turn them into a jam-azing sauce for your duck. You'lld need:
1. 1/2 Cup honey
2. 2 Cups of Jelly, combined (whatever jellies and spreads you have kicking around in your fridge)
3. The juice of one lemon
4. 2 Tablespoons of ground ginger root
5. 1 Tablespoon of your favorite hot sauce
Put all this is a pan and heat to a boil. Turn down the heat and let simmer for 20 minutes. Then let the sauce cool until it becomes thick and sticky. That way is easily adheres to the bird.
Check out the completed bird in the video. It tasted as good as it looks.
Showing posts with label Green Egg. Show all posts
Showing posts with label Green Egg. Show all posts
Sunday, April 1, 2012
Sunday, December 4, 2011
Succulent Smoked Turkey: The Thanksgiving Series, Number One
As Griller Instinct begins its Thanksgiving series, we wanted to dive right in and give you the item that we and our holiday guests were most thankful for: Succulent Smoked Turkey
Now, I'm sure many of you are asking yourselves, "Why would you smoke a turkey, let alone do it for Thanksgiving?"
1. After having dozens of people over for Thanksgiving, and having made turkey many ways, smoked is the overall favorite.
2. Smoking a turkey leaves room in the oven for other stuff.
3. The carcass makes kick ass turkey soup.
Be forewarned: Smoking a turkey is a three part process, but it's a labor of love and like most of the recipes you've tried so far, your guests will appreciate your effort.
Step 1: Brine the Turkey. Brining is important as the turkey absorbs the brine flavor while allowing the meat to stay very moist during the cooking process. For a 15-20 lb turkey, you need to make 2.5 gallons of brine, and as it takes about 12 hours to fully cool, the brine should be made ahead of time (1-5 days). Once the brine is at refrigerator temperature, add the bird and let it soak for 12-24 hours. The longer it soaks, the more brine will be absorbed into the meat. When you are ready to smoke the bird, pull it out, rinse it off, and pat it dry. Here is the brine recipe.
Step 2: Smoke the Turkey. Soak some wood chips (I find that Apple goes very well with turkey) and bring your smoker to 325 degrees. Add the chips and to the smoker place the bird inside with a pan underneath. This will catch drippings that you will use to baste the bird as it smokes, and if you choose to afterwards it can be used to make a killer gravy. To create a starter baste, I like to put some butter (1 stick), broth (I use 2 cups chicken broth, but any kind will do), a beer (12 oz), and the gizzards (finally, they are good for something other than scaring the kids!) into the pan. Smoke the turkey for 15-17 minutes per pound, or until the thermometer pops out of the breast. Baste every 30-45 minutes. When it's done, wrap with foil and let it rest for 20 minutes before carving.
Step 3: Make the Gravy. I use the turkey baster to suck about 3/4 of the liquid out of the pan 30 minutes before I think the turkey is done. This is your gravy base. The liquid will have a heavy smokey flavor, so you will need to cut it with more broth before you reduce it. Here is the gravy recipe.
This is the complete Thanksgiving video. You will see everything we made, including the Succulent Smoked Turkey.
Next week, I'll pass along a recipe for Brussels Sprouts your kids will actually eat. You won't want to miss it.
Tuesday, October 18, 2011
Hickory Smoked Chicken Soup – With Grilled Veggies
We’ve been doing a lot of smoking lately, but so far, no chicken has made it to the grill. That is, until now. Since I read the requests, and since the weather is turning cold, this Hickory Smoked Chicken Soup recipe is for you (and you know who you are).!
Everyone has a chicken soup recipe. I’m not trying to say mine is better than yours; it's probably just different from yours (though, like my award-winning Chili, my soup recipe may also beat yours in a local competition, but I don’t want to challenge any sort family recipe passed down from your grandmother and the like...).
Smoking a chicken is easy. It cooks at the same temperature (325-350 degrees) that it would in the oven. No need to cook slowly, and chicken absorbs the smoke flavor very easily. The pop up indicator tells you when it’s done, so there is no need to mess around with meat thermometers. This can be easily done on a gas grill, as well. Just follow the instructions for indirect gas grilling.
Making the broth for the soup is also easy. I buy good quality chicken stock then add vegetables and boil for an hour. That makes the broth taste homemade. If you want to make the it from scratch, that’s a long process, as you need to smoke the chicken, wait for it to cool, pull off the meat, then you can start your broth. Too long!
Grilling the vegetables is simple. It just takes a few minutes.
The smoky chicken gives the soup a whole new element of taste. Give it a try.
Check out the video:
Tuesday, October 11, 2011
A Baby Back Birthday
Saturday was my daughters 8th birthday, and as I was busy building a zipline for the kids, my wife was left doing all the prep work--and clean up--for this meal (so I have to give credit where credit is due). She followed all the recipes to the letter (on this blog), and when I tasted the finished product, I knew the ingredients, their quantities, and their incorporations were just as they should be.
This is what was on the menu….
Baby Back Ribs
Baby Back’s have a lot of meat and are much easier to work with than the less expensive ribs. It’s worth the extra money, especially if you don’t have a full day to commit to smoking. Baby Back ribs take four hours to smoke, and another twenty minutes if you want to add BBQ sauce.
While I recommend Baby Backs if you are cooking at home, there are other types of ribs, including Memphis and Spare Ribs. These have larger bones and take longer to cook which generally make them better suited for dining out than dining in.
When you purchase ribs there may be membranes on the back side, which needs to be removed and before you leave the store, be sure you know if the membranes are still attached (sometimes, I find it hard to tell). The ribs I buy from Stew the butcher come without the membrane (it is removed at the processing plant) and in the off chance I buy ribs where the membrane has not been removed, I get Stew to do it.
If you're stuck with the unfortunate task of removing the membrane yourself, a certainty if you're shopping at Costco or BJ’s, get ready spend some time getting that membrane off. Here is how I'd recommend you do it. Once the membrane is off, you're ready to prep your ribs for the smoker!
To prepare the smoker for use: I use oak and hickory wood in the smoker and, under the grate, I keep a pan filled with beer to keep the smokers moisture content high.
1. Add a generous amount dry rub to the ribs.
2. Smoke the ribs at 275 degrees for about four hours (Baby Back ribs only). When the meat pulls back from the bone, and the bone sticks out ½ inch, the ribs should come out of the smoker.
3. Every hour, baste the ribs. I make a 50/50 mixture of beer (I used Pabst) and white vinegar and add it to a spray bottle. That’s an easy and efficient way to apply it. This adds flavor, and again, keep the ribs moist.
4. I finished these ribs in the oven (my grill was occupied with food for the kids). I mopped on the BBQ sauce, back side first, and baked at 375 degrees for 10 minutes. Then I flipped the ribs, mopped sauce on the front and baked for another 10 minutes.
5. I removed the ribs from the oven, and cut them into threes.
1 rack of baby back ribs will serve 2-3 people. Serve left over BBQ sauce on the side.
But Neil? What if I don't have a smoker?
Baby Backs are so easy to work with, you don’t have to smoke them. Just adding a dry rub and grilling over medium heat for 40 minutes (20 min per side) will give you an awesome meal.
Mac and Cheese (C'est Cheese)
Uncle Bill’s Garlic Bread – We didn’t make it this time, but we usually do, as it goes very well with ribs.
Check out the video.
Sunday, August 14, 2011
Pulled Pork BBQ
I'm having a party and I want to wow my guests. To do so, I'm willing to invest most of a day smoking meat, but I also want to hang out it the yard and drink beer with Rocco. So... I'll be making Pulled Pork BBQ. This is a serious undertaking and it's not for the faint of heart, but it's well worth the effort. Everyone loves this stuff. It's great for a party and the last time I made it was for my daughter's 5th birthday.
For those of you that have been keeping up with my previous posts, we'll see what your chops are made of with this new recipe!
Here's your timeline:
The day before your party, pick up the pork shoulder. This may also be called Boston Butt (I'm not sure why, but if you know, please leave a comment). I've also seen it called a picnic shoulder, but only at crappy low end grocery stores. Let's steer clear of those. Rub the pork with.... you guessed it... Magic Dust. Saran Wrap the pork and refrigerate overnight.
10 hours before you want to eat, soak you chips and start your coals. This will ideally be done in a smoker, which is almost as good is a charcoal grill, but can also be done on a gas grill if need be. If you plan to do this in the oven, in a pressure cooker ,or in a slow cooker, you are not making Pulled Pork BBQ. You are making pulled pork. That kind of sucks, and if you're having a party, your friends deserve better. Take the meat out of the fridge and let it start to come to room temperature.
9 hours before you want to eat, start smoking. If you have a smoker, get it to 275 degrees and figure the meat will cook for eight hours. Note: if you are using a charcoal or gas grill, it will be hard to keep the temperature that low so the meat won't take eight hours to cook. Figure 7-8 hours for your cook time.
Note: place a drip pan under the pork (under the grate) and pour a beer into it, to help keep things moist.
As the smoke tapers off (every 60 minutes or so), add more smoking chips.
5 hours before you want to eat, start checking the internal temperature of the meat. The first milestone will be 175 degrees. This is the temperature when the meat will be done absorbing smoke and will begin to dry out.
Once you reach 175 degrees wrap the pork in two layers of heave duty aluminum foil. Take some of the juices in the drip pan and pour them over the pork and wrap the juices up with the meat. Do a good job wrapping so nothing leaks out. Return the pork to the smoker and continue cooking to 200 degrees. During the last 25 degrees of cooking is when the connective tissue breaks down and the pork begins to fall apart (becomes pullable).
Remove the pork from the smoker, unwrap it and let is rest for 30-60 minutes before you want to eat. Start warming your BBQ sauce on the stove.
30 minutes before you want to eat, pull your pork. You can use two forks which is a pain in the ass. Or you can use rubber gloves. I use these. You can also buy gloves like these at the hardware store. They are cheap and really easy to clean. Just wear them and wash your hands in the sink when you are done.
Next, add BBQ sauce to the pulled pork. How much? Go with your gut! But not too much! Don't drown the pork. The taste of the meat and the smoke should be the predomninant flavor. The taste of the sauce should be secondary.
Mix your sauce in and cover the pan to keep warm. I put the covered pan onto the smoker to keep warm or to heat it back up. Sometimes I use the oven if the smoker has cooled considerably.
What kind of BBQ sauce?
This is a long involved question that I will cover in the near future. There are so many kinds of sauce. Most of the time I make one red BBQ sauce (tomato based) and one white (vinegar based). Then everyone at the party argues which sauce is better. Kind of like the old "Tastes great / Less filling" commercials. But the key is that I MAKE THE SAUCE.
BBQ sauce is one of those things that tastes much different when it is made fresh. It makes a big difference. However, I realize this whole ordeal has been a tremendous burden already, so I will share with you my favorite store bought sauce. It comes from one of my favorite BBQ restaurants, Dinosaur BBQ. I can get this sauce at my local market. If you can't, order some, and keep it in the cupboard, for all sorts of applications.
Use the store bought sauce to get started. I will also post at white (vinegar-based) sauce recipe at the bottom of the blog. That takes 5 minutes to make, so just do it; you've come this far, don't ruin your Pulled Pork BBQ now!
Have your guests load the pulled pork onto thick white bread, top with Slaw (recipe at bottom of blog), and make a sandwich.
Good luck! No mater how this comes out, you will have the respect and appreciation from your guests for making the effort to do it right.
The video below is from the birthday party. There is a shot of C'est Cheese, my mac and cheese recipe, which, like all the others, can be found at the bottom of the blog.
Subscribe to:
Posts (Atom)