Griller Instinct is skiing in Utah. Check on the lunch we found! Wings, brisket, and ribs all while sitting outside in the sun, surrounded by snow.
Wednesday, March 14, 2012
Monday, February 27, 2012
Sous-Vide New York Strip
Here at Griller Instinct, we typically discuss the finer points of, well, grilling. My friend John, however, has been talking up the sous-vide method of cooking: what it is, why someone would do it, and the fact that it's not as hard as I'd always imagine.
Since John was kind enough to both teach me abou sous-vide and lend me some of the equipment necessary to do the cooking, I wanted to pass my experience along in kind.
What is sous-vide?
For our purposes, we had Stew the butcher vacuum seal five NY Strip steaks. I placed them in a water bath and set a water circulator to 128 degrees, then let them "cook" in the water bath for 4 hours. If I were to make the steaks again, I would have made the bath 130 degrees, so learn from my soue-vide mistakes.
Since John was kind enough to both teach me abou sous-vide and lend me some of the equipment necessary to do the cooking, I wanted to pass my experience along in kind.
What is sous-vide?
The simplest way to define sous-vide may be to refer to its French meaning, “under vacuum.” Anything associated with a vacuum machine is sous-vide. In restaurants, the sous-vide process usually (but not always) consists of:
- placing products into impervious plastic bags
- putting those bags under vacuum
- heat sealing those bags
- releasing the vacuum
- further manipulating, processing, or storing
For our purposes, we had Stew the butcher vacuum seal five NY Strip steaks. I placed them in a water bath and set a water circulator to 128 degrees, then let them "cook" in the water bath for 4 hours. If I were to make the steaks again, I would have made the bath 130 degrees, so learn from my soue-vide mistakes.
Why would someone do this?
I see two uses for doing this at home: first, the end results have a unique texture. In the case of the steaks, the texture is unusual because the meat sits in the water bath for four hours, they turn out very tender.
The second reason you might want to try sous-vide is its precise temperature control. I set the water bath to 128 (rare) and no matter how long I leave it in there the steaks won't over cook.
Can I do this at home?
Only if you have a water circulator. You also will need access to a vacuum sealer (and I was lucky enough to have Stew vacuum seal my steaks).
After the steaks were in the water bath for four hours, I removed them from the plastic wrap and seared each side for on minute, on a screaming hot cast iron skillet (600+ degrees).
I let the steaks rest for five minutes and they came out great.
I poured the remaining juices that were left in the bag into a pan, added red wine, and reduced it for a sauce.
Do you like Chemistry? If so, here is some good info on cooking sous-vide. I would say sous-vide is 50% Chemistry 50% cooking, but 100% delicious.
Friday, February 3, 2012
Vermont Ski Weekend

We took Griller Instinct on location to Mount Snow, in West Dover, Vermont last weekend and though the weather has not been favorable this skiing season, we've managed to keep the food top-rate.

To ensure our food had a nice rustic touch to it, we cooked over an open wood fire, reducing some logs over an old Weber grill, down to embers. This takes some extra time, but it's worth the effort, with the process taking about 90 minutes for 8 logs.
Once started, the fire becomes very hot! So hot, in fact, that it became tough to stand near it and the steaks cooked quickly. "But, Neil, how thick should my steaks be?" is something I'm sure you're asking yourself, and after much trial and error, I can tell you that I had my butcher cut my meats to 1 and 3/4 inch thickness. All you need is a little salt, pepper and olive oil, and these steaks can cook in 9 and 1/2 minutes on a hot grill.
And, of course no lodge dinner wouldbe complete without a few sides. To start, we made reduced onions, made with with five thickly sliced Vidalia onions placed in a big pot, with Olive oil in the bottom. Cook this on the stove at medium low for about an hour until the onions reduce, the liquid boils out and they caramelize. Then, they are ready to be served on top of the steak.
Then there is our easy Creamed Spinach. Defrost three boxes of frozen spinach and put in a dish towel. Squeeze as much water out as possible. Add the spinach to a pan with about 2 cups of heavy cream, 2 tablespoons butter and some salt and pepper. Cook this on the stove until it hot and thick.
Lastly, we rounded it out with Shrimp in a Boil Bag. We intended to make it with garlic but someone forgot to buy some, so we audibled to lime and butter. So, one pound of shell on shrimp, 3 tablespoons of butter, lime juiced, salt and pepper. Wrap in foil and grill for 5 minutes on a side. One man's mistake is another man's tasty side dish!
Check out the video:
Monday, January 9, 2012
Angry Lobster with Spinach
Angry Lobster with Spinach is a recipe I adapted from different dishes I have tried at several restaurants.
The way it's both prepared and served when dining out requires a lot of special equipment, but after some time, I was able to figure all the ingredients and modify the recipe so it could be made at home. Though more interestingly than its preparation (which the video shows is very interesting), people seem to want to know why it's called "Angry Lobster" and the answer is simple: it has a ton of flavor, it's a bit spicy, and it just definitely looks the part.

Here a few important notes:
1. This is not an every day type of dish. While it's worth making (because it's so good), it makes a mess and there a lot of ingredients. I recommend saving it for a special occasion. We made it most recently on New Year's Eve.
2. The lobster has to be split. The claws, the tail, and the parts the attaches the claw to the body (I don't know what those are called) need to be split long way to expose all the meat. This needs to be done when the lobster is raw. The splitting process will make a mess (you will see me get hit with flying lobster goo in the video).
Can you get the Fish Monger to do it for you? I've never asked, but it you can, that's a big step towards making this easier. If you go that route, you really need to have the lobsters split within a few hours of it being cooked. If you do it yourself, splitting should be done with a clever or a heavy knife. Have some work gloves at the ready (one's that can be thrown out when you are done). If possible, do this outside.
3. Lobster is really cheap right now. I bought five 1.5 pound lobsters for less that $70.
4. Kill the lobster in a humane way. The video explains how to do that.
Read the recipe carefully before you get started. Here it is.
Check out the video. This is a funny one. My friend, Greg, is our guest butcher. He's one of those people that comes over to eat ALL the time, and always brings something nice, but is reluctant to help cook. So... I give him the nastiest jobs. As always, he was a good sport about it.
Tuesday, January 3, 2012
Grilled, Yes, Grilled, Meat Loaf (For Kids!)
I like to think that most of my recipes are born out of a great story, but sometimes, their creation just boils down to sheer necessity.
My youngest daughter is a lot like me in that she's stubborn and loves a good hamburger. However, that did not bode well for me when I tried to get her to eat meat loaf (a favorite of mine, second only to this Meatloaf).
But with much perseverance, comparing meat loaf to a hamburger, and a fair amount of bacon, I was able to convert my daughter. Since then, it's turned into a love affair, and my two daughters had tasked me with figuring out how to make meat loaf on the grill. It's a fun and easy project, and it has helped me get the kids more involved with grilling, which is something I love.
 Here's the recipe for kids (below I've included a recipe that's a bit spicier for adults):
Stew the Butcher makes us a meat loaf mix which consists of 4 pounds of ground beef, pork and veal.
This will make enough for four separate loaves, so if you don't want to make enough to put 3 in the freezer as our family does, simply divide the portions as needed.
Put the meat loaf mix in a big bowl and add:
3/4 Cup Unseasoned Bread Crumbs
1/2 Cup Ketchup (optional)
1/4 Cup Italian Seasoning
4 Eggs, beaten
1 Bunch Fresh Flat Leaf Parsley, chopped
Combine the ingredients and separate into 4 loaves and top with bacon.
And for adults who like spice:
Add Salt, Pepper, Garlic Powder, Onion Powder, and Red Chili Flakes to taste.
Wrap your loaf up in foil and put it on a heated grill (I wrapped it twice so the bottom would not burn). Since the meat loaf has pork in it, we need it to come to 165 degrees in the center. This took abut 45 minutes (medium heat). Make sure you check the temperature using a meat thermometer.
Check out the video:
My youngest daughter is a lot like me in that she's stubborn and loves a good hamburger. However, that did not bode well for me when I tried to get her to eat meat loaf (a favorite of mine, second only to this Meatloaf).
But with much perseverance, comparing meat loaf to a hamburger, and a fair amount of bacon, I was able to convert my daughter. Since then, it's turned into a love affair, and my two daughters had tasked me with figuring out how to make meat loaf on the grill. It's a fun and easy project, and it has helped me get the kids more involved with grilling, which is something I love.

Stew the Butcher makes us a meat loaf mix which consists of 4 pounds of ground beef, pork and veal.
This will make enough for four separate loaves, so if you don't want to make enough to put 3 in the freezer as our family does, simply divide the portions as needed.
Put the meat loaf mix in a big bowl and add:
3/4 Cup Unseasoned Bread Crumbs
1/2 Cup Ketchup (optional)
1/4 Cup Italian Seasoning
4 Eggs, beaten
1 Bunch Fresh Flat Leaf Parsley, chopped
Combine the ingredients and separate into 4 loaves and top with bacon.
And for adults who like spice:
Add Salt, Pepper, Garlic Powder, Onion Powder, and Red Chili Flakes to taste.
Wrap your loaf up in foil and put it on a heated grill (I wrapped it twice so the bottom would not burn). Since the meat loaf has pork in it, we need it to come to 165 degrees in the center. This took abut 45 minutes (medium heat). Make sure you check the temperature using a meat thermometer.
Check out the video:
Monday, December 26, 2011
Grass-Fed Veal Chops
For those of you who don't already know, grass-fed meat is a big deal right now. Most meat we eat is fed a grain diet, and that tends to make it fat and meats fed a grass diet is a more natural alternative. The other health-friendly aspect to grass-fed meats is that they are generally raised without antibiotics or other hormone treatments. With regards to taste, it's more earthy and in terms of cooking, it cooks faster (no fat means it will cook fast and dry out quick, so you need to reduce cooking times).
The Griller Instinct team has mixed opinions. We like fat, however, we don't want to be fat, so we use a mix of meats. Once or twice a week I get grass-fed meat from Stew the Butcher, and it's always on a night when I'm making an effort to eat healthy
On other nights, I enjoy the full fattiness of grain-fed meats. Who doesn't? Fat equals flavor, and if you like to grill, you know the value of fat. (If I could have my way, I would buy grass-fed meat that has been fed grain to add fat, right before it's slaughtered. Does that exist? I don't know. I'll check with Stew...)
Stew recently introduced me to a grass-fed meat I have not had previously had: Grass-fed Veal. I was initially skeptical. Isn't good veal supposed to be milk-fed? Apparently not. After trying this veal chop, it was obvious the flavor is much better than milk-fed veal, and it also has plenty of fat.
Why does grass-fed veal have a good amount of fat? Good question. I don't know. What's the flavor difference? Milk-fed veal is a bit bland, in my opinion. Grass-fed veal has a more beefy taste, and not overwhelmingly so, just more so than regular veal. I wasn't buying a lot of milk-fed veal for that very reason, it lacks meaty flavor.
The visual difference is what is most significant between grass fed-veal and milk-fed veal. Grass-fed looks like red meat and milk-fed is white(ish). So don't be surprised if you pull out your cut of meat and it doesn't look like your standard chop.
The bottom line is you should ask your butcher for some grass-fed veal chops. They're really terrific, and right now, reasonably priced (until everyone catches on).
This is the veal with a lemon caper sauce.

To make the lemon-caper sauce for two veal chops:
1. Zest one lemon with a Microplane, then juice the lemon. Combine the juice and the zest with two tablespoons of drained capers.
2. In a small frying pan, saute five minced cloves of garlic in five tablespoons of olive oil for two minutes.
3. Add the lemon juice, zest and capers to the frying pan.
4. Add fresh ground pepper to taste and pour on top of the veal.
Check out the video:
Monday, December 19, 2011
Aunt Rachel's Latkes
We here at Griller Instinct usually like to show you what we've done to celebrate the holidays after the fact. Well, we're going to get in front a holiday for a change: Hanukkah is soon! So of course I'm going to share with you our family's latke recipe which is so easy and delicious, you may find yourself eating them straight through Christmas!
Some people think that latkes are only for people who celebrate Hanukkah, or that they're only meant to be eaten this time of year. And for those people, I tell them, "Don't be ridiculous!" Latkes are basically hash browns, and you can make them for Christmas, for Kwanzaa, for your birthday, for breakfast, or just for fun.
Here is the recipe.
Here is a picture of the latkes frying. Make note of the deep pan, as it keeps oil from splattering everywhere and making a mess.
Now, since this is a blog that caters to those with a griller instinct, I have to let you know that it is possible to make these latkes on the grill. Simply heat up your pot of oil on the grill and stay vigilant about the temperature not rising too high!

And here is a quick video tutorial.
And as a special surprise: Not Latkes
I sent my friend, Marshall, a picture of the latkes as they were frying last night. He was then kind enough to respond with what he was making. And that means I get to share with you Bacon-Wrapped Dates with Roquefort Cheese and Toasted Almonds inside.
I can't be certain, but I believe that he plated the dates with pink grapefruit slices topped with black sesame seeds. What am I certain of is that it looks awesome. Hopefully, he'll send in the recipe, and if he does, I'll be sure to share it with you!

Tuesday, December 13, 2011
Finally, Brussels Sprouts Your Kids Will Eat
Yes, your kids will eat these. And they will like them, too! Satisfaction guaranteed, or I'll give you a full refund for the cost of your Griller Instinct subscription.
To cut to teh chase, here is the recipe.
Note: This is not a Griller Instinct original. This is a recipe by Chef Michael Symon.
While the Brussels Sprouts are not an original, it is Griller Instinct tested. Though our official certification is still pending, I think my street credit should be enough to get you to give these a try.
And if you haven't seen the Thanksgiving video yet, here is is again. You will see Lisa, my wife, making this delicious recipe.
Friday, December 9, 2011
If You Aren't Going to Grill Your Own...
...At least go have the best steak you can, and for me, that's Peter Luger.

There aren't many good reasons to go to Brooklyn and, in fact, after Luger's, my list runs a little thin. But the outerborough location doesn't stop my buddies and me form kicking off the holiday season with a trip to Peter Luger.
(If you are in the New York area, let the below entice you;for the rest of you, proceed with jealousy...)

If you want to eat the best steak on Earth, you must travel to New York City. I know this statement will generate a lot of angry emails about your favorite steak house in Singapore, or Budapest, or wherever you are, but trust me, Peter Luger is better.

A few notes about Peter Luger:
- It's in Brooklyn, so it's a pain in the ass to get to.
- It's not fancy.
- It's cash only.
- It's old school, with a lot of wood and old man waiters.
- I've never seen a menu.
And yet.... every time I go, I am reminded how much better it is than any other steakhouse.

Now, I'm sure a lot of you are asking "Why? Why is this steak better than any others you may have had?" And my honest answer is: I have no idea. Maybe it the quality of the meat. Maybe it's how it's prepared. Maybe it's the handle bar mustaches on so many of the waiters. I can't be sure, and surely we'll never know.
The real question is: why can't all the copycat steakhouses in Manhattan that have been opened by ex-Luger employees duplicate the food? There must be a secret and I don't know what it is.

Five of us dined, and we enjoyed:
Steak for 5 medium rare (Porterhouse, obviously)
Hash Browns
Creamed Spinach
Thick-Cut Bacon
Shrimp Cocktail
Tomato and Onions
And, of course, plenty of Peter Luger sauce on the side.

Our story doesn't end here, but the meal does. We left full and happy, and are sure to return, likely to have the same meal as you can't go wrong with a great steak, a lot of liquor and good company.
And don't worry: for those of you who have been asking for the Brussels Sprouts recipe, it's coming; I'll get it out to you the next few days.
There aren't many good reasons to go to Brooklyn and, in fact, after Luger's, my list runs a little thin. But the outerborough location doesn't stop my buddies and me form kicking off the holiday season with a trip to Peter Luger.
(If you are in the New York area, let the below entice you;for the rest of you, proceed with jealousy...)
If you want to eat the best steak on Earth, you must travel to New York City. I know this statement will generate a lot of angry emails about your favorite steak house in Singapore, or Budapest, or wherever you are, but trust me, Peter Luger is better.

A few notes about Peter Luger:
- It's in Brooklyn, so it's a pain in the ass to get to.
- It's not fancy.
- It's cash only.
- It's old school, with a lot of wood and old man waiters.
- I've never seen a menu.
And yet.... every time I go, I am reminded how much better it is than any other steakhouse.

Now, I'm sure a lot of you are asking "Why? Why is this steak better than any others you may have had?" And my honest answer is: I have no idea. Maybe it the quality of the meat. Maybe it's how it's prepared. Maybe it's the handle bar mustaches on so many of the waiters. I can't be sure, and surely we'll never know.
The real question is: why can't all the copycat steakhouses in Manhattan that have been opened by ex-Luger employees duplicate the food? There must be a secret and I don't know what it is.

Five of us dined, and we enjoyed:
Steak for 5 medium rare (Porterhouse, obviously)
Hash Browns
Creamed Spinach
Thick-Cut Bacon
Shrimp Cocktail
Tomato and Onions
And, of course, plenty of Peter Luger sauce on the side.

And don't worry: for those of you who have been asking for the Brussels Sprouts recipe, it's coming; I'll get it out to you the next few days.
Sunday, December 4, 2011
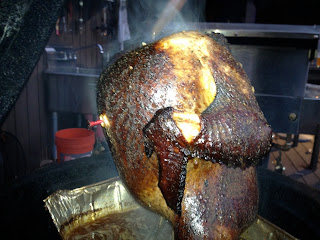
Succulent Smoked Turkey: The Thanksgiving Series, Number One
As Griller Instinct begins its Thanksgiving series, we wanted to dive right in and give you the item that we and our holiday guests were most thankful for: Succulent Smoked Turkey
Now, I'm sure many of you are asking yourselves, "Why would you smoke a turkey, let alone do it for Thanksgiving?"
1. After having dozens of people over for Thanksgiving, and having made turkey many ways, smoked is the overall favorite.
2. Smoking a turkey leaves room in the oven for other stuff.
3. The carcass makes kick ass turkey soup.
Be forewarned: Smoking a turkey is a three part process, but it's a labor of love and like most of the recipes you've tried so far, your guests will appreciate your effort.
Step 1: Brine the Turkey. Brining is important as the turkey absorbs the brine flavor while allowing the meat to stay very moist during the cooking process. For a 15-20 lb turkey, you need to make 2.5 gallons of brine, and as it takes about 12 hours to fully cool, the brine should be made ahead of time (1-5 days). Once the brine is at refrigerator temperature, add the bird and let it soak for 12-24 hours. The longer it soaks, the more brine will be absorbed into the meat. When you are ready to smoke the bird, pull it out, rinse it off, and pat it dry. Here is the brine recipe.
Step 2: Smoke the Turkey. Soak some wood chips (I find that Apple goes very well with turkey) and bring your smoker to 325 degrees. Add the chips and to the smoker place the bird inside with a pan underneath. This will catch drippings that you will use to baste the bird as it smokes, and if you choose to afterwards it can be used to make a killer gravy. To create a starter baste, I like to put some butter (1 stick), broth (I use 2 cups chicken broth, but any kind will do), a beer (12 oz), and the gizzards (finally, they are good for something other than scaring the kids!) into the pan. Smoke the turkey for 15-17 minutes per pound, or until the thermometer pops out of the breast. Baste every 30-45 minutes. When it's done, wrap with foil and let it rest for 20 minutes before carving.
Step 3: Make the Gravy. I use the turkey baster to suck about 3/4 of the liquid out of the pan 30 minutes before I think the turkey is done. This is your gravy base. The liquid will have a heavy smokey flavor, so you will need to cut it with more broth before you reduce it. Here is the gravy recipe.
This is the complete Thanksgiving video. You will see everything we made, including the Succulent Smoked Turkey.
Next week, I'll pass along a recipe for Brussels Sprouts your kids will actually eat. You won't want to miss it.
Subscribe to:
Posts (Atom)